You know from reading about us that when we get on a kick with something, we inevitably become addicted.
It should come as no surpise then that when we were renovating our sitting room a couple of years ago, it happened.
You might remember, our sitting room originally looked like this.
I still shudder when I see those pictures. I also should acknowledge that the quality of the pictures is so terrible because when we moved, my camera was in a box somewhere. I was left with no choice but to use my daughter's old school camera with film. At the time, I had no idea I'd ever be blogging about our crazy house, so the thought of getting digital pictures never dawned on me.
Anyway, after ripping off all of the cat scratching pads that were affixed to the walls and removing all of the paneling that had been painted with a palette of primary colors, Jason sheetrocked the whole room, ripped out the old fireplace and installed a new one, and created a banister with spindles to open up the stairs.
All this from a guy who never owned a power tool.
All this from a guy who never owned a power tool.
But he wasn't done. He really wanted some boxed wainscotting trim in the room, so he set off to learn how to do it.
We bought a book and apparently, there is a mathematical formula on how to calculate what size all of the boxes should be so they are uniform throughout the room.
I couldn't believe how much the room had transformed once he completed all of the trim. It gave the room a much more formal look. This picture was taken when I was afraid to decorate my mantel.
But he didn't stop.
And in the hall.
And he was headed to put it in the dining room, but I stopped him. As much as I loved it, I didn't think it should be on EVERY wall in the house.
Maybe some day I can get him to share the equation with you so you can try it if you want. He tells me it's not that complex. I know home improvement stores sell pre-made boxes, but they are so much more expensive than just cutting the trim yourself.
Shelley, over at House of Smith's just transfomed a bathroom in her house and they installed boxed trim too. I love how she applied a vinyl pattern inside the boxes. I also love the antique glass knobs that serve as towel holders.
Heather and her husband just renovated a couple of rooms in their house and decided to add boxed molding too. Check out their before and afters at McKinney Living. I love the changes they've made in their home.
And here are a couple of inspiration pictures I found of more boxed trim in beautiful homes.
Here is one of the boxed trim going up the stairs.
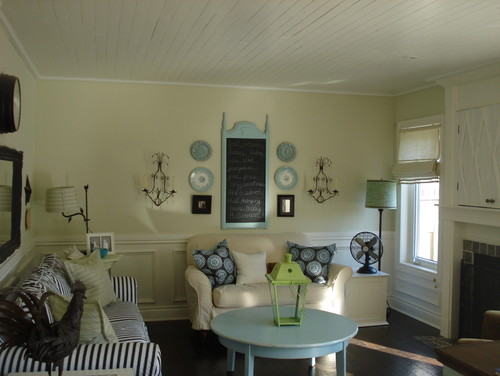
I really like how the next picture blends a couple of different decorating styles. The white wood ceiling gives the room a cottage feel, yet they also added the boxed trim. I really love the blend of old and new here.
It really adds character, doesn't it?


Beautiful. I am so inspired to add the moulding to our stairwell!!!
ReplyDeleteThat husband of yours is too clever!! Your house is looking wonderful Stephenie and I'm trying to work out where I could try that. Wall mounted cat scratching pads...you're kidding me right?
ReplyDeleteWOW I can't believe the AFTERS! It looks SO SO SO good!
ReplyDeleteShelley
Um. Hello? Gorgeous !!!! Thanks for flaunting your boxed trim, now I feel totally inadequate. Ha ! Kidding ! I'm totally inspired !!!!! Thanks so much for sharing !
ReplyDeletexo
Kate
I am SO sending these pics to my husband. We've been tossing ideas back and forth but this, I think, is a good blend of both our ideas. Your husband did such a wonderful job - it looks fantastic.
ReplyDeleteStephenie,
ReplyDeleteThe before and after pictures say it all. Jason did an amazing job!
Deborah