


PhotobucketPhotobucketPhotobucketPhotobucketPhotobucketPhotobucket
Showing posts with label storage. Show all posts

Wednesday, September 19, 2012

How to Save Mementos

Now that summer has come to an end, you probably find yourself with a whole lot of memories of summer vacations, picnics and family gatherings.

With those memories often comes 'stuff' you collect in an attempt to preserve those memories - to hold onto a piece of them forever so that you won't forget.

The part of me that still has Bea Johnson from "Garbology" whispering in my ear tells me to tell you to stop collecting stuff because it will only clutter your life and will probably just end up in a landfill at some point.

But another part of me - a bigger part of me - a part of me I am struggling to change- identifies with keeping every ticket stub and every seashell because each one conjures up a feeling I don't want to ever forget.

So what can you do with all of these  mementos?
 
 
Of course there's always scrapbooking, but I've told you a thousand and one times that I'm not neat.  Jason would have to be the one to make all those cuts and glue everything to the pages in straight lines. 


But there are some other ways to preserve memories.  Keeping mementos in jars is one that I really like (although I've never actually done it).


Of course that savvy couple John and Sherry over at Young House Love have done it:


I like this one because of the uniformity of all of the jars:


Maybe your objects don't fit nicely into a little jar.  How about a memory tree?  Here, family mementos are preserved on  little tree.


Or maybe you have a bunch of things that trigger memories, but you don't want them on display?  You might consider a memory box.  You could have one for each memory, or one big box that houses a bunch of mementos.
 

Source: via Wajeeda on Pinterest
 
 
And what about storing mementos that aren't necessarily from vacations, but are daily items like child's artwork?  There are a million different ideas on Pinterest and all over blog land on the best ways to manage the pounds and pounds of artwork that comes home, but here are a few of the displays I like best.
 
 
Creating a wall to serve as a "gallery"  looks nice and will certainly honor your little artist


This chalk board is fun because you can change the art whenever you want and draw whimsical frames around the piece.


Keep it simple with a series of clip boards


I love these white frames with all of the colorful kid's artwork displayed.


And what about greeting cards, notes and other little mementos?
 
 
Here is a nice little booklet was created to keep a couple's wedding cards.  The details are beautiful (see the little cross at the top of the ring?  Love it!)


Here an old shutter is re-purposed to display cards.

Source: bhg.com via Stephenie on Pinterest


I like this simple envelope idea to store kid's notes.
 
 
Simply place the notes inside, put a sticker on the front and date it.


What do we do?
 
Well, we are big fans of real photos, so I try to get them printed regularly and put them in photo albums. 
 
You might recall that our seating arrangements at our wedding turned into a book of personalized messages from each of our guests.  You can read about it here.
 
The cover is a picture of us and inside there is a photo of each guest and the message they wrote to us on the back.


And for all of Imani's awards, ribbons, etc, I keep them in a 3-ring binder with clear sleeves.  It's nothing earth shattering or particularly beautiful but it's a place where everything is stored in one spot for her to look back one day and take with her if she wants.


As for children's art? We used to keep every piece but that got overwhelming quickly. So we have a couple of storage bins and we choose our favorite pieces and display them on the side of the refrigerator when they first come home. After that, they are stored in the bin in the basement. Some pieces of artwork have been turned into magnets, others have been turned into Christmas ornaments.
 
We also have decorative boxes - one houses mementos from Imani's infancy (like baby shoes, a frilly dress, etc) and one houses mementos from our wedding. 
 
What about you? What's your favorite way to store mementos?


Thursday, May 3, 2012

Organzing Drawers

I'm still trying to figure out how to blog more frequently while holding down a full time job and having  a one year old and an eleven year old.  If anyone out there has any tips, please let me know.  I always think about tons of ideas to share with you all but can't manage to find the time to take pictures, upload them, edit them and write the post.

For those of you who know me, you know I have a lot of hobbies too. Jason and I both love to work out and I enjoy all kinds of crafts -- so balancing everything is a bit overwhelming at times.
But I truly enjoy this blog and all that goes along with it - the creative process, the friendships I've created all over the world, the sharing of ideas so I truly would like to make it a more regular part of my life; I just haven't figured out how.

I admire those who have.


Anyway - I've been trying to get organized around here.  I've gotten a lot of questions from people on how to stay organized with kids -- especially with all of the toys and "stuff" they accumulate.  I'll try to share some of what's worked for us in the coming weeks. 

For those of  you who have kids who are a bit older  - this post is for you.

Imani is constantly getting her nice clothes dirty by playing outside in them. Don't get me wrong, I want her to have fun and get dirty -- I just don't want her outside in a brand new pair of pants that we bought less than an hour ago sliding in mud (yes, this really happens).

Imani is the kind of girl who defies all gender stereotypes. From the time she was a toddler, I had buckets of Oxyclean  around my house with her clothes soaking in them because she found sticks and mud much more interesting than barbies and doll houses. I can't say that I blame her.

My nickname as a child was "Grubby."

Thankfully, I outgrew that.

What makes this more frustrating is that Imani chooses to grub up her clothes and then chooses those exact same ripped jeans and stained shirts to put on before we're about to go to dinner at a friend's house.  She has a little bit of trouble determining when it's appropriate to wear stained versus not stained clothes.

So I decided to try to help her with a bit of organization.

I busted out the good ole' label maker.


And labeled her dresser drawers accordingly:


We also labeled the inside of all the play clothes with by writing "PC" on the tags so there wouldn't be any question about what clothes belong where.
Imani usually puts her own laundry away so this makes it much easier for her to know where everything goes - and she knows what clothes to wear depending on what she's going to be doing.


After I finished with Imani's drawers, I realized I wasn't exactly setting a good example with my own disorganized drawers.  While I didn't need to use the label maker, I did need a new system. I have a lot of clothes and I tend to just cram them in my drawers.


I've confessed several times that I am not the organized one in the house -- Jason is. 

He's the Type- "A" - the one who cleans constantly and makes sure everything is in its place -- the one who neatly puts his clothes away and makes sure every dresser drawer is closed - the one whose hangers and shirt collars are all facing the same direction in the closet.

I'm the free spirit - the one who carelessly crams all of my clothes in my dresser and attempt to shut it with clothes hanging out -- the one who lets my closet become a disaster and then,  after about a month of living like a slob - decides its time to get organized.

This was one of those months for me.


I had seen an image on Pinterest that showed clothes stacked or "rolled" rather than folded and stacked.  Clearly the traditionally way wasn't working for me.

So I rolled all of my sweaters:


And stacked my t-shirt drawer too:


And after about three weeks, I'm happy to say that my drawers are still (fairly) organized.  It makes so much more sense this way because I can see all of my shirts.


What's worked for you to keep your drawers organized? Got any tips? I'd love to hear 'em!

Tuesday, March 8, 2011

Nursery Closet Complete

For those of you who have asked or are wondering . . . no, I haven't had the baby yet.  I'm actually due in two and a half weeks on March 24

so . . .

 . . . . my belly continues to grow 

. . . .we continue to do projects around the house to get ready for our newest family member

. . . I continue to work full-time (which is why I haven't blogged in a week)


. . .  we continue to toss around baby names


and I cherish every minute of the miracle that is pregnancy.


I am happy to say that the nursery is almost complete.  I just hope we finish it before the baby gets here, even though he'll be sleeping in our room in a bassinet. 

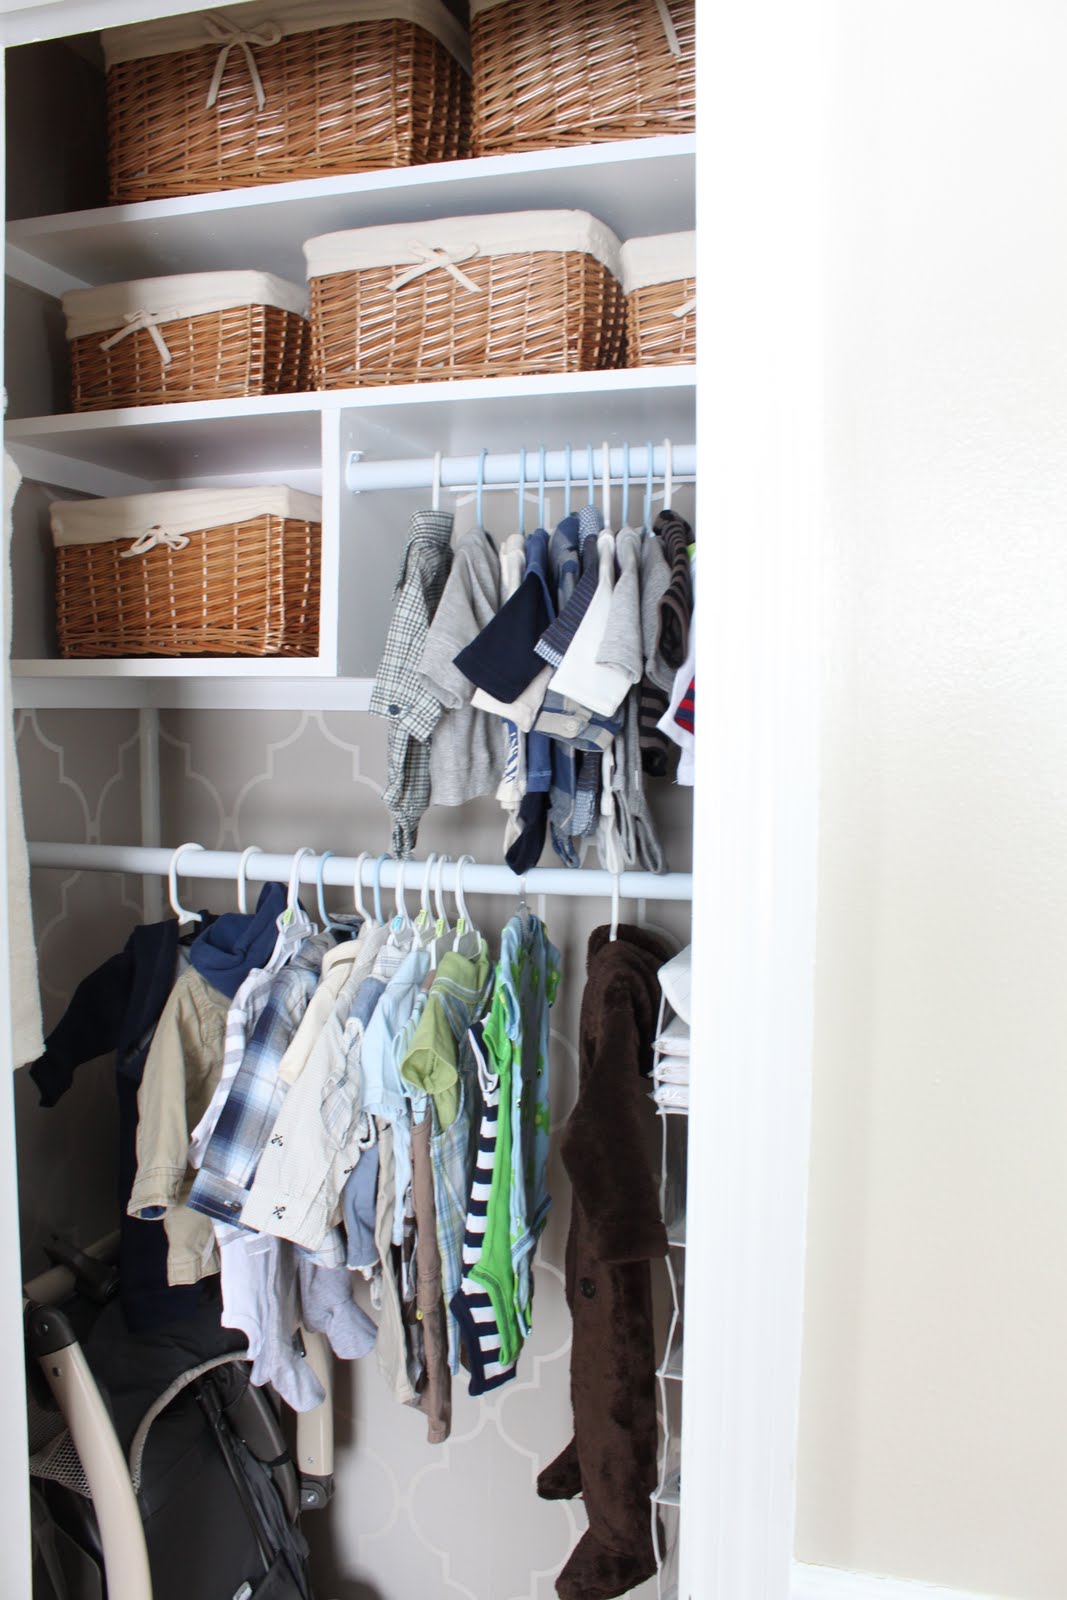
Our most recent nursery project was to address the closet.  Initially, Jason was just going to paint the interior of the closet white, but in my quest for storage because we live in such a small house, I had bigger plans.

I wanted a closet that was divided with two hanging bars, to accommodate little clothes. 

I also knew I wanted baskets in the closet to provide attractive storage for all things baby.


Finally, I knew I wanted a pattern inside the closet - either stenciled or wall-papered. 

And I knew I was probably driving my husband crazy with my wishes for a cute closet.

So we set out for Lowes and looked at their closet organization systems.  I almost fell over when I saw the price tag on these systems.  Some were as much as $400 and none offered the simplicity I was looking for in such a small space so I asked Jason if he'd be willing to build what I envisioned.

He said yes.

So we purchased some lumber, some hanging bars, some wallpaper, and some baskets and we headed home on a mission.

First, we had to clean out the closet that once served as a catch-all for crafts, the vacuum cleaner, miscellaneous papers, artwork and who knows what else.


It was actually much worse than this . . . but Jason had already started to clean it out and was insistent I NOT take a picture of the mess.  Fortunately, I snuck in and took the photo when he was off finding new homes for some of the junk.  Otherwise, you wouldn't be able to appreciate the transformation.

Once the closet was cleaned out, Jason went in and spackled all areas that were rough or had little nail holes to ensure the wall paper would go on smoothly.


Once that dried and he sanded it down, the wall paper went up.  I never knew how messy installing wallpaper was but it was worth all of its gooeyness. 

Unfortunately, I didn't get a picture of the goo but every time Jason would smooth out the wall paper a big mess of glue would seep out from under the wall paper.  Maybe we didn't wait long enough to  put it on or it was too wet.  


In any case, I absolutely love the way it turned out.


Next, my dream maker began building shelves to house the baskets.


And before I knew it, there were a couple of shelves and a couple of rods to hang little clothes.


Finally, the shelves were primed and painted white and my vision became a reality.


I put all the little adorable clothes in there and filled the baskets with blankets, toys and other baby items we'll be using in a couple of weeks.

I love that the stroller fits in there tucked away in the corner.


Wow! I still can't believe the before and after!

                                                              Before:


After:


 I still want to get all matching baby hangers since currently some are blue and some are white but I wasn't going to wait to post this until I waddled over to Tar-jay to get matching hangars.

I'm so glad we didn't spend all of that money on the closet organization system from Lowe's!


And Jason is glad I took a "before" picture.


Stay tuned this week for more nursery updates!

Linking up with:


The DIY Show Off


Monday, February 7, 2011

Hacking up a Dresser

So most of you know that we were going to sell our house in preparation for expanding our family.

We just didn't think this house was big enough.

But after a failed home inspection and a feeling of sadness of leaving this little Cape, we decided to stay put.

We thought it would take a while to get pregnant and maybe we could put an addition on the house, but nope!  We were pregnant within one weekend . . .

Some things are just mean to be, I guess :-)

So now we are faced with the dilemma of a lack of space and I keep reminding myself that people have more children in homes much smaller than ours and they manage just fine.

But the space issue keeps nagging at me. It keeps me awake at night.

Take our bedroom for instance.   With its typical Cape Cod-Style slanty ceilings, we are limited with where we can place furniture,  because it hits the ceiling in some areas.

So I recently showed you our bedroom, which looked like this:


You can't see it that well, but there is a large dresser to the left of our bed.  Here is the old photo with our giant king-sized bed that was waaaaaaay too big for our little bedroom.


YIKES . . . that picture scares me on so many levels.  Don't the candlesticks look like they will catch the ceiling on fire?  Fortunately, those were never lit and they have long been donated to the Salvation Army.

The dresser is placed to the left of our bed because it is the ONLY place it will fit in our bedroom.  If we placed it on the right side, it would block our closets.  Anywhere else it would hit the slanty ceilings.


The problem is, this is the exact spot where I plan to put the baby's bassinet.  Here is the one we've been eyeing at Pottery Barn.

Image: Pottery Barn
I love that it has a removable moses basket that can easily be brought downstairs for naps, and I love the storage area underneath.  I'm all about the storage from living in a house with very little closet space.
What's even better is that it has this adorable bedding that hides the storage underneath
(Ours would be white with blue bows. . . )

Anyway, my dilemma is that if I place the bassinet next to the bed, it would block Jason's dresser.

So I was tossing and turning in bed one night worrying about it, when I had a genius idea!   I woke Jason up to tell him about it.

"J . . . I figured it out.  You could cut the dresser to remove one of the drawers and shorten the dresser so it would fit in the little nook on the other side of the bedroom!"

Here is the area where I envisioned moving the dresser.


But Jason was having none of it.


Jason:  "Stephenie go to sleep. You're crazy.  We're NOT cutting the dresser."

Silence.


I can't believe this man still doubts me.  When he does, I only become more adamant and I find myself becoming more and more confident that my idea will work.

Can you believe it . . . this past Saturday night, we found ourselves hacking up the dresser,
hoping the idea would work.


First, Jason removed all of the drawers and took a look up underneath to see how the top of the dresser was secured.  He was happy to find that the top was screwed on to wooden supports.


So he began to unscrew the top from the supports and we labeled everything so we could reassemble it later.


The top came off easily.


But the moulding was a bit more of a challenge because it had been glued on so out came the ole' chisel.


And here is when the Coupon Cowboy started doubting the project and telling me that perhaps we should just throw the dresser away and buy a new one.  (I think he forgot our New Year's Resolution).

But he continued chiseling and eventually, the moulding came off.


We were left with a dresser that looked like this.


Next, we figured out where the moulding would need to be placed once we cut off the top drawer and measured down.  It was about 8 inches, so we marked accordingly all the way around the dresser.


And then the cutting began. 


Jason had to be careful not to cut unevenly or he would have a slanty dresser that would
match our slanty ceilings.


The dresser started looking like this.


Once it was cut all the way around, the reassembly began.  Jason swears by this stuff:


Apparently, it's about as strong as cement.

So my Mr. Dream-Maker took that gun of cementy goodness and applied it all around to reattach the moulding and the top of the dresser.


This stuff is so messy and sticky, you have to use gasoline to remove it from your skin. No joke.


Next, the supports were screwed back on (and stapled).


Once the moulding was reattached, it looked like this.


Finally, the top was screwed back on.
Here's what was left over from all of our hacking
(and one drawer, which I'm not sure what we're going to do with yet)


Jason was so happy that the top was actually level!


And I was thrilled that it actually fit into the little nook perfectly and that I'd get to go to bed . . . since we finished cleaning up around 3 AM!
 
Can you believe it?  We have ourselves a nice short dresser.


My poor husband did lose a drawer, so I offered up one of mine from my dresser, but he declined.


Here is the space now. We moved the mirror and jewelry armoire there, but that will be moved once we get the bassinet. I just didn't want a big empty space.


We're both loving the space that was created from this project.

Next up:  REFINISHING the furniture to something lighter and changing the hardware. 

Stay tuned and wish us luck!


Linking up with:

handmade projects


Today's Creative Blog

The Girl Creative


The DIY Show Off


Join  us Saturdays at tatertotsandjello.com for the weekend wrap 
 up           party!

The Lettered Cottage
Related Posts with Thumbnails