


PhotobucketPhotobucketPhotobucketPhotobucketPhotobucketPhotobucket

Sunday, May 2, 2010

Saturday Smiles

Saturday was a good day for me. 

Sunday, not so much.

But I don't want to tell you about Sunday. 

Let's focus on Saturday.

In the short time that I have been blogging, I have met some amazing people.  I'm not just talking about people who are incredibly creative, or people who inspire others.

I'm talking about people who have strengthened my faith in the goodness of humanity.

So many people from all over the world have reached out to help me in one way or another.  These are strangers whose lives I never knew existed -- sending me emails to ask how I am doing when I haven't blogged in a while or offering to help me with technological issues related to blogging.

Saturday when I got my mail, I found an envelope and didn't immediately recognize the return address.    You all know how much I love getting mail, right?

When I opened it, once again, I discovered how wonderful my fellow bloggers are.


And these:


I cannot even begin to tell you just how much this meant to me.  I know it was a very small project but I was so discouraged by the whole experience of my former platter breaking that I had never gone out to find a replacement.

I would like to point out that I don't really know Shelley from Wonderfully Wordy very well.  I had only ever placed one order with her . . . the letter "A" for my platter that shattered.  It wasn't like I had been a regular customer who brought her a ton of business.

Shelley's kindness and thoughtfulness is just what I needed.  Saturday I made a trip to Hub's Place and found a few different platters and a plate stand.


Thanks Shelley.   You truly made my week.


PS -- Don't forget to enter my first Giveaway!


Saturday, May 1, 2010

My First Giveaway!

In celebration of reaching 100 followers, I am hosting my first giveaway!

Don't worry, you don't have to be a follower or have a blog to enter.

I will give a one-year magazine subscription to one of the following magazines.  If you win, you can choose which magazine subscription you'd like.

To enter, leave a comment that explains one of the two choices:

1.  Tell me the home improvement project or craft you are most proud of having done.  If you have a link to your project, feel free to leave it if  you want.

or

2.  Tell of a home improvement/decorating dilemma that you currently have.

***To get a second entry in the contest, simply blog about this giveaway and let me know you did so! You can grab my button that's located on the left sidebar, or just link to this contest.

This giveaway will close Friday, May 7th 2010.   A winner will be selected at random from the comments that have been left.

 Thanks, and good luck!

Magazine choices:


1.  Country Living


2.  Better Homes and Gardens


3.  House Beautiful


4. Coastal Living


Friday, April 30, 2010

Hiding Bad Ceilings

When we first moved into our house, there were so many areas that needed to be addressed immediately.  We all slept in one bedroom because the other two were in such disrepair. 

We fixed a lot of the aesthetic stuff first just so we wouldn't be embarrassed when we had friends and family over -- like removing these fish that were decoupaged on the walls.


After we'd been in our house for a while, we started addressing other areas, like crazy ceilings.

Whoever lived here before us had no idea how to sheet rock a ceiling.  The seams that showed were an  eyesore.

Here's Imani's bedroom ceiling, which still hasn't been fixed (and we also would love to change the light fixture but we're resisting, since we are planning to sell our house soon).     See that seam running down the middle of the ceiling?  It drives Jason crazy every time he's in Imani's room.


One of Jason's least favorite home improvement projects is sheetrock and spackling and when it's on the ceiling, that makes him even more miserable.

So what have we done to address these crazy, bumpy, seamy ceilings?  In some cases, like our kitchen, Jason ripped down the old ceiling and started over.  But another thing we've done that we've been equally happy with was to use a quick fix that gave some rooms more of a cottage feel.

We used wood panels to cover up the ceilings.

Here is our staircase ceiling.  You can see the section that isn't covered isn't looking so hot.


So rather than rip down the existing sheet rock and start over, Jason went to work covering the ceiling with wood panels. 


If Imani and I are busy, Jason always has company from one of his biggest fans -- Maggie.  Maggie never leaves Jason's side, even if stuff is falling down from the ceiling all around her while Jason works. 


After we get all of the boards and trim up, Jason paints them white, although we have friends who stained theirs and they look great that way too. 


Here's Herb and Cindy's house.  You can see that they installed wood throughout their home -- on their walls as well as on their ceilings. 


While we were looking at houses, we saw a lot of ceilings we didn't like.  Some had ceiling tiles, like what we used to have in our closet under the stairs.


Jason fixed those with the same wood panel solution and painted them white.


Some houses had textured ceilings, which I know some people love, but they just aren't our style.


And other houses just had owners who lacked sheet rocking and spackling skills..


Here's a picture I found where people covered their walls and ceilings in beadboard.


beadboard.com


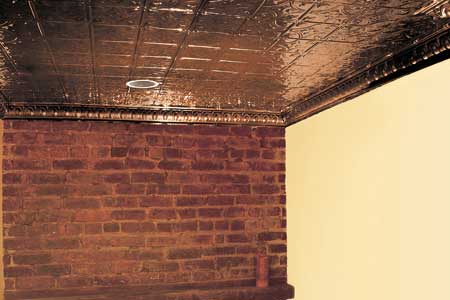
Another solution I like is covering the ceiling with tin.

Image: This Old House


Have you looked up lately?  What's the deal with  your ceilings?

Thursday, April 29, 2010

Addicted to Oars

A few weekends ago, Jason found an oar he loved at an antique store near our house.  I checked out the price tag: $50. 

"No way are we spending that much money on an old oar," I said matter-of-factly.

Since I am in sales and I have a very large territory I often come across antique stores on my lunch hour or on my way home that I would have never discovered if I didn't have a job that requires so much travel.

I remembered seeing old oars at an antique shop about 45 minutes from our house.  They were only $20.

So last Friday, on my way home from work I stopped at this little shop and was happy to see that the three oars still remained.  Two were red and one was a grayish blue.

I snagged the grayish-blue one.  I loved that it was all chippy and still had the hardware on it.

When I got home, Jason went to work figuring out how to hang it.

First, he put one screw at each end of the oar.


Next, he put wire around the screw to form a loop so that it could hang on the wall.


When he was done, it looked like this:


We decided to hang it above the window in the guest room. 


Now Jason wants me to go back to the antique store and buy the two other oars.  In typical addict fashion, one oar isn't enough.  He wants to decorate with a bunch of oars.

Actually, now that we got the computer out of the guest room and into the new office nook (which was a closet), there is a lot more space in the guest room and there is a big wall with nothing hanging on it.  Three oars hanging in a vertical row might just look nice.

And I can get all three for only $10 more than we would have gotten one! 

Let's hope somebody else didn't snag them before I get there.


Tuesday, April 27, 2010

Absent

I woke up this morning to an email from my mother asking me if I had forgotten to update my blog.


It made me smile. To answer her question, which might very well be the question many of you have:


No, I haven't forgotten to update my blog.

You might think that I am busy making those Pottery Barn grapevine chargers.


Negative.

The grapevines still sit in a garbage can outside. However, I won a virtual Easter Egg scavenger hunt over at The Fairfield House and was thrilled to see the prize arrive by mail yesterday -- a $25 gift card to Pottery Barn!


At the time of the scavenger hunt, I didn't even know what the prize was, but I was frantically searching for the egg in Deborah's photos. I would have been thrilled to have won whatever the prize was -- even if it was a leg lamp, or a secret decoder that told me to "Drink More Ovaltine."

What can I say?  I'm very competitive.

But a gift card to Pottery Barn was such an awesome prize, so thanks Deborah!

You might think I have been busy decorating my new office nook.


Negative.


Jason moved the computer in, but the walls remain bare.


Maybe I've been busy working on designing Lori's foyer?


Nope.  (Although we have made some progress)

I've been absent because Jason and I have been searching for a new house.  It's an exhausting endeavor, but hopefully soon I'll have good news!


Saturday, April 24, 2010

Closet Office Progress

Jason  has made some serious progress on turning our hall closet into an office.  The major work is pretty much done.  All we have left to do are a few finishing touches and decorating.

A brief word about this space:  This closet is located under the stairs in our Cape Cod style home.  It has served many purposes.  When we first moved in, it served as a place for all of Imani's messy toys, like paints, crayons, games with a million pieces, moon sand etc. 

About a year ago, I moved all of her stuff out and re-claimed the space as storage for all of our miscellaneous belongings. 

Here is the mess we had going on.


When we started our guest room redesign, I decided I wanted to hide my office stuff, like the computer, printer and office accessories.  My solution was to move the office into the closet.  It took a bit of convincing, but I got Jason on board and, like always, he went to work to fulfill my wish.

The first order of business was to move all of the stuff out and find a new home for most of it.

Here is the closet when it was almost empty.


Notice that horrible cheap tiled ceiling and the strange recessed light on the wall?  Jason was convinced the light came out of a submarine.

Jason set to work, first installing beadboard up the wall and then painting it white.


He also ripped out those ugly panels on the ceiling and installed wooden planks, which he painted white.  The floor was in rough shape, so Jason sanded it and finished it with polyurethane.  Here's a picture of it just as he was finishing and I ran in with my camera to remind him he's not allowed to finish without first taking a picture!


He also added a board with sliding rails under the desk area for our keyboard to the computer.

Finally, he painted it and changed out the light fixture.  We got the lights at Overstock for $30 a piece.  I'm considering getting a table lamp to add more light to the space.  Check out these table lamps on Overstock  and let me know which one you think would look nice on the desk area.  I'm thinking maybe the Grandrich Paper Shade table lamp, but I'm still not sure.

Here's the progress.


Here is a before and after, just for fun.   Not bad for just under $125, right?

BEFORE


AFTER


We used "Cozy Cottage" by Valspar on the walls.  I wanted a light yellow on the walls and the idea is that I will also use this chair in there.


We still have to select what accessories we will put in here -- pictures of some sort on the wall, storage for office supplies, desk accessories, etc.  Any ideas you have to make this space beautiful would be greatly appreciated!


PS -- Notice my new header and button?  I am super thrilled that my good friend Ben hooked me up with these.    .  You might remember Cindy and Herb of Country Buzzins?  They are the cool folks who create antique-looking signs.  If you missed all of their great work and their cool house, no worries! I posted about them here.  Well, Ben is their incredibly talented son (who just happens to be married to one of my very close friends, Brittney . . . who I am trying to convince to start a blog.)   Ben is an artist, teacher, and an incredibly creative person, very much like his parents.  A big thank you to Ben.  If you get a chance, head on over and check out his art work!


Thursday, April 22, 2010

All Trimmed Out

You know from reading about us that when we get on a kick with something, we inevitably become addicted.

It should come as no surpise then that when we were renovating our sitting room a couple of years ago, it happened.

You might remember, our sitting room originally looked like this.


And this:


I still shudder when I see those pictures.  I also should acknowledge that the quality of the pictures is so terrible because when we moved, my camera was in a box somewhere.  I was left with no choice but to use my daughter's old school camera with film.  At the time, I had no idea I'd ever be blogging about our crazy house, so the thought of getting digital pictures never dawned on me. 

Anyway, after ripping off all of the cat scratching pads that were affixed to the walls and removing all of the paneling that had been painted with a palette of primary colors, Jason sheetrocked the whole room, ripped out the old fireplace and installed a new one, and created a banister with spindles to open up the stairs.

All this from a guy who never owned a power tool.

But he wasn't done.  He really wanted some boxed wainscotting trim in the room, so he set off to learn how to do it.

We bought a book and apparently, there is a mathematical formula on how to calculate what size all of the boxes should be so they are uniform throughout the room.

I couldn't believe how much the room had transformed once he completed all of the trim.  It gave the room a much more formal look.   This picture was taken when I was afraid to decorate my mantel.  


But he didn't stop.

He decided to put the trim up the stairs.


And in the hall.


And in the guest room (which we're still working on renovating by the way).


And he was headed to put it in the dining room, but I stopped him.  As much as I loved it, I didn't think it should be on EVERY wall in the house. 
Maybe some day I can get him to share the equation with you so you can try it if you want.  He tells me it's not that complex.   I know home improvement stores sell pre-made boxes, but they are so much more expensive than just cutting the trim yourself. 

Shelley, over at House of Smith's just transfomed a bathroom in her house and they installed boxed trim too.  I love how she applied a vinyl pattern inside the boxes.  I also love the antique glass knobs that serve as towel holders.


Heather and her husband just renovated a couple of rooms in their house and decided to add boxed molding too.  Check out their before and afters at McKinney Living.   I love the changes they've made in their home.


And here are a couple of inspiration pictures I found of more boxed trim in beautiful homes. 

Here is one of the boxed trim going up the stairs.

Traditional Stair traditional staircase

I really like how the next picture blends a couple of different decorating styles.  The white wood ceiling gives the room a cottage feel, yet they also added the boxed trim.   I really love the blend of old and new here.


Beadboard  family room traditional family room


It really adds character, doesn't it?


Related Posts with Thumbnails